How to Decoupage Easter Eggs
Today, we’re sharing another simple and budget friendly way to customize your Spring décor with a look at how to decoupage Easter eggs!
Let me ask you guys a question, how long has it been since you spent an afternoon crafting?
Don’t worry, it had definitely been too long for me too.
In fact, I couldn’t remember the last time I let myself sit down to craft uninterrupted with basic materials like paper and glue. But a few days ago, it was windy, rainy and cold outside which felt like the perfect day to throw on some sweats, grab a cup of hot coffee and settle into a bit of crafting.

Now, you’ve probably seen decoupage projects all over the internet. These projects cover everything from pumpkins to pots to trays by some really creative bloggers.

Since this was my first-time trying to decoupage anything, I decided I would start with the smallest possible project just in case I got in the reeds. And since we’re well into the spring season I chose – Easter Eggs – and you guys, it couldn’t have been easier!

I’m not going to lie this project was crazy messy but once I got the hang of everything it went pretty quickly. I learned a lot along the way so here’s a look at what you’ll need to keep in mind if you want to try this project too…
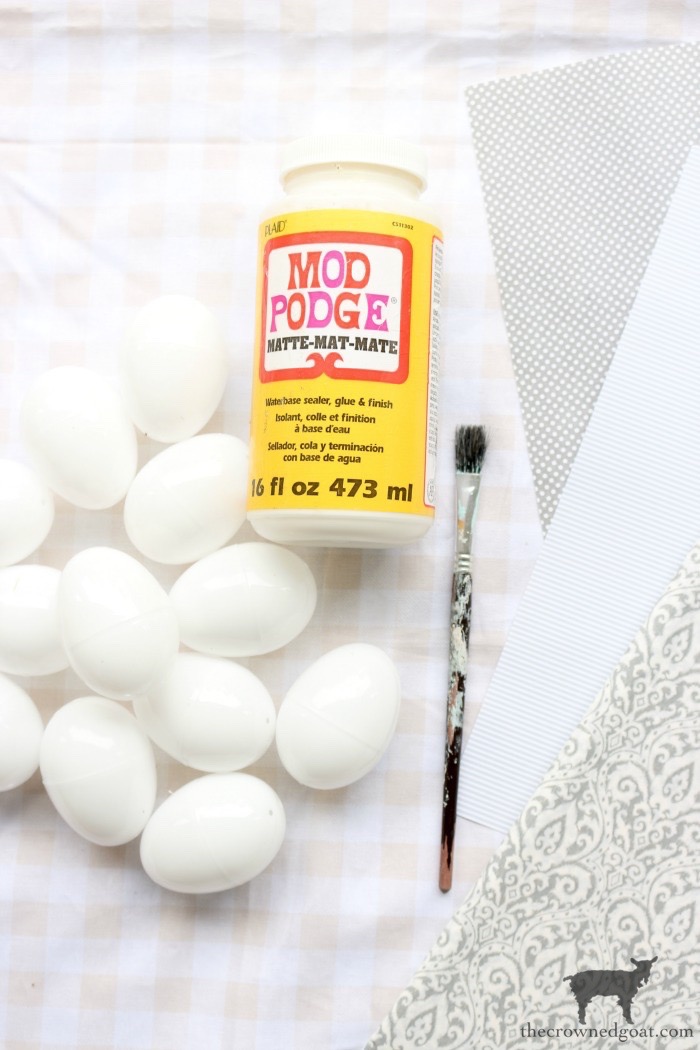
Decoupage Easter Egg Supplies:
- Mod Podge
- Craft or sponge brush
- Eggs (we found these plastic eggs from Hobby Lobby on sale)
- Tissue paper or paper napkins in the color of your choice (we found this tissue paper at Hobby Lobby)
- Tarp to cover your work surface
- Wax Paper or Container to hold your eggs while they’re drying (we used a paper egg crate)
- Embellishments, optional (we used gray and white ribbing from Hobby Lobby)
Decoupage Easter Egg Steps:
Step 1 & 2
Lay a tarp over your worksurface area, as this project can be messy. Begin by tearing or cutting your tissue paper or napkins into small pieces. Set aside in a pile.

Step 3
Brush a bit of Mod Podge directly on the egg with a craft or sponge brush.

Step 4
Then, lay a piece of tissue paper over the area where you brushed on the Mod Podge and gently press the tissue into the egg.

Step 5
Keep repeating this process until the entire Easter egg is covered in tissue paper and Mod Podge.

Step 6
Finally, paint the entire egg with another layer of Mod Podge.

Step 7
Allow to dry completely (at least 30 minutes) on wax paper or in an egg container. Keep in mind, the Mod Podge will cause the eggs to stick to whatever they’re resting on, so you’ll want to make sure you keep rotating them until they’re completely dry.

Step 8
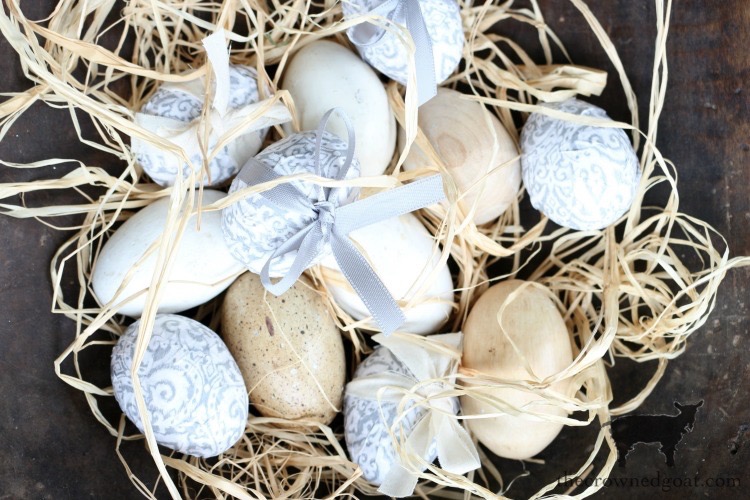
After the Easter eggs have dried, embellish as desired. We used gray and white ribbon but you can use whatever embellishments you like best.

Just for the sake of full disclosure, I started out thinking I could use a mix of tissue paper and scrapbook paper to decoupage these Easter eggs, but the scrapbook paper didn’t look as good as the tissue paper. There were wrinkles everywhere and they were harder to get out than the tissue paper. If you’re a decoupage newbie like I am, my suggestion is to use tissue paper or paper napkins. It seems the thinner the paper the better.

My other piece of advice is to have a wet or moist towelette like a Wet Wipe close by because my fingers got really sticky as the Mod Podge dried to the touch quicker than I thought it would.

All in all, though, I would definitely try to decoupage Easter eggs again because they were super easy and not really time consuming at all. In fact, I knocked these out in less than an hour. I also love the fact that you can completely customize these decoupage Easter eggs to complement your spring décor which makes them a budget friendly decorating solution too!
Let us know if you have any other decoupage secrets! We’re excited to try other quick and easy projects like these Easter eggs. Until next time, I’ll see you on Instagram, Facebook and Pinterest.

Many blessings,
CoCo


Your eggs are beautiful, CoCo! I love the muted colors that you used and the addition of the ribbon. I made some decoupaged eggs this spring using eggs that my grandmother blew out years ago. My aunt saved them and passed them along to me knowing that I’d eventually use them. Thanks for linking to my flower pot project in your post!
These are cute Coco. I dont think.I’ve decoupaged anything in years. I do miss the adult coloring book phase though.
It has been way too long for me as well, Bonnie, but after giving myself an afternoon just to create I think I’m going to try and work it into my schedule now. I bought S several coloring books while she was going through her leg surgery and she loved them too! Hugs, CoCo
Hi CoCo! I love your decoupaged eggs. They’re so pretty! Amazon has some cool chinoiserie paper napkins but the really pretty ones are on back order. But they make gorgeous chinoiserie eggs and pumpkins. I’m sure you’ve seen them on Pinterest. I’ve even seen them done with bits of pretty wallpaper, that turned out just beautiful. But I’m with you, the thinner the paper the better because you can mold the paper around the egg better if it’s thin. I’ve also used tissue wrapping paper before and it worked well too. Thanks for the post! Have a great day! ?
I’ve never tried to decoupage with pretty wallpaper but I will definitely give it a shot, Shelia, thanks for the heads up! I’m always on the lookout for vintage papers that has those little ditsy flowers on them. I have several pictures of my Mom in flour sack dresses and those flowers are always so pretty to me. I’ll be on the lookout for the chinoiserie napkins too. Several of my friends decoupage with napkins from Tuesday Morning but I haven’t had a chance to try it yet. All of them say they have a good selection of napkins at great prices which is always a win, right? Sending you hugs, CoCo
Your decoupaged eggs look lovely!
I really appreciate it, Claire, thanks so much! I’m bananas for your egg wreath too – it’s so pretty! Hugs, CoCo
CoCo – these eggs are fabulous! Love the paper that you chose. Thanks so much for sharing our decoupage pumpkins. This is the type of project that is addicting – you want to decoupage everything LOL. Much love!
I know! I’m on the lookout for some pretty napkins now that I’ve tried the tissue paper technique so I can try your napkin technique and see how that goes. I’m might be decoupaging everyone’s Christmas gifts this year 🙂 Hugs, CoCo
So so cute! Decoupaged eggs are on the agenda for the week. Thanks for sharing at TFT dear friend!
They were crazy easy to make Amber! I don’t know what took me so long to try decoupaging. I kind of want to decoupage everything now ha ha. Sending you big hugs, CoCo