How to Stencil Textured Walls
We’re sharing how to stencil textured walls today!
A big thank you to Stencil Revolution for sponsoring this post.
As always, all opinions and experiences are my own. You can read our full disclosure policy here.
This post was updated in 2025 and orginally posted in 2018 as part of the Fall One Room Challenge with media partners Better Homes and Gardens and the Home Love Network.
Our Inspiration…
Of all the kitchen projects we’ve been working on for the One Room Challenge, partnering with Stencil Revolution to stencil our pantry walls with their French Bee Trellis Stencil is one of the projects I’m most excited about.
And I’ll be honest, somewhat nervous about too.
While I have plenty of experience stenciling floors, pillows and trays I have zero experience stenciling walls.
Our walls have an “orange peel texture,” which pretty much limits our wall treatment options to paint, moldings, some type of wainscoting or planking.
I see all these beautiful wallpapers and starched fabrics and dream about how gorgeous they would be on our walls.
But textured walls and wallpaper just don’t seem to mix.
So, I decided to spruce them up a bit with a stencil and paint.

Our walk-in pantry is the perfect place to try out a wall stencil because it’s basically a 4x6x9 jewel box just inside the kitchen.
Honestly, I had no idea how this project would turn out.
But it’s such a small area I figured I had nothing to lose by trying, you know?

Thankfully, the French Bee Stencil looks fabulous and we learned so much about how to stencil textured walls along the way.
I’m sharing our experience with you in the hope it will help save you time and frustration if you ever decide to do something like this at your house.
Here’s a look at how to stencil a textured wall.

How to Stencil a Textured Wall…
Textured Wall Stencil Supplies:
- Stencil Revolution French Bee Trellis Stencil
- Paint (We used Valspar’s Cathedral Stone for the stencil paint color)
- Stencil Brush
- Paint Tray
- Lint free cloth or towel (to brush off excess paint)
- Tape (specially made for textured walls – we used Frog Tape)
- Tarp to protect your floor and surfaces
- Level/Ruler/Measuring Tape
- Pencil
How to Stencil a Textured Wall Steps:
Step #1: Prep and Paint Surfaces Prior to Stenciling
Before you start stenciling make sure your walls have been appropriately prepped and are free from any dirt or debris.
Tape off trim and molding.

Lay down a tarp to protect the floors and other surfaces from any paint overspray.

If you decide to paint your textured walls make sure you’ve allowed enough time for the paint to properly cure.
We painted our walls using Valspar’s Bistro White.

Step #2: Unroll Your Stencil and Make Sure the Stencil Cutouts are in Tact
Wall and floor stencils can be packaged many different ways.
So, make sure your stencil is completely in tact prior to using it.

If you’ve never used a stencil before, consider practicing with your stencil first.
That way, you can get the hang of it.

Step #3: Measure the Middle of the Wall You Want to Start On
Use a measuring tape, level or ruler to measure and mark the middle of the wall you want to start on.
We started on the wall opposite the window at the very top of the wall in case there were any mistakes and thank goodness we did.
You’ll read more about that in next step.

Step #4: Secure the Stencil to the Wall with Tape
Make sure you’re using the right size stencil for your specific project.
Also, make sure you’re using a tape that is specially formulated for painted textured walls.
I thought all wall tape was basically the same.
But I could not have been more wrong.

There is nothing more frustrating than stopping for less than a minute to check on your dog only to have your entire wall stencil slide off the wall before the paint is dry and smudging nearly every.single.image. you’ve just painted.
I still can’t believe it happened.

We had to completely repaint and stencil the whole section again.
And switched to using Frog Tape immediately.
Just a heads up, you’ll likely go through more tape than you expect if you have a large area to stencil.
There was a lot more repositioning than I anticipated.
Step #5 & #6: Lightly Dip Your Stencil Brush into the Paint then Brush Off the Excess Paint on a Lint-Free Cloth
I mistakenly thought I would be able to roll the paint onto the stencil for the textured walls.
I could not have been more wrong though.
Rolling, even with a special nap roller, left the stencil transfer a hot mess.
So save yourself some time and a lot of frustration by using a stencil brush.
Yes, it will take longer but the quality will be better.

Lightly dip your stencil brush into your paint.
We used Valspar’s Cathedral Stone.
Then brush off any excess paint on a lint-free cloth.
You actually need very little paint on your brush to stencil.
Any excess paint will cause major bleed through on textured walls.
So, keep that in mind.

Step #7: Carefully Fill in the Stencil Form
When your filling in the stencil form with paint, use a circular motion to transfer the stencil image properly.

If you’re experiencing bleed through or smudging, you likely have too much paint on your brush.

Another reason smudging might happen is when you have paint caked on the back of your stencil.
If you’re not able to quickly wipe the paint off, you probably need to stop and clean your stencil.

Step #8: Allow Proper Drying Time Before Carefully Removing the Wall Stencil
In my experience the drying time was fairly quick because I didn’t have a lot of paint on the brush.
That said, if your paint has not properly dried, you risk smudging the transferred image any time you move the stencil.
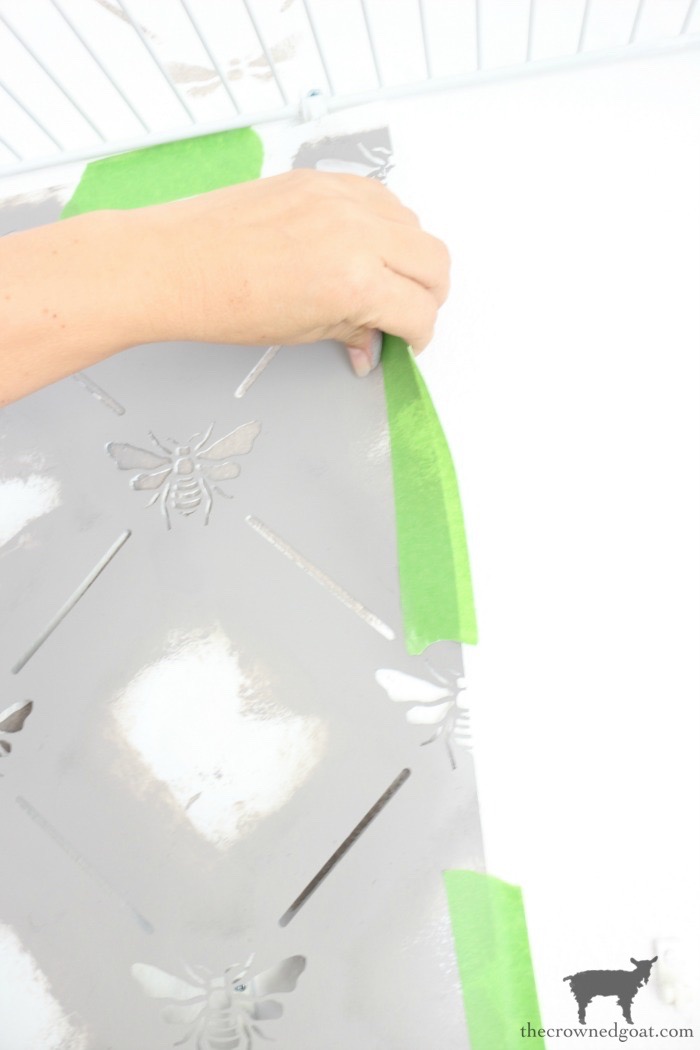
Step #9: Realignment is Key
The pattern on the French Bee Trellis stencil was really easy to reposition and realign which was a blessing given our 9-foot ceilings.
You can see here how we were able to use the pattern to help us realign.

Be very careful when you reposition the stencil as it will smudge if the paint has not properly dried.
In addition, your pattern will be also be off completely if you haven’t repositioned your stencil accurately.

This is especially true when you’re working around the corners or working around objects like the clips that hold in the pantry shelves.
They were a beast to work around!

Step #10: Use a Detail Brush to Fix Any Mistakes
Let face it, stencil mistakes are going to happen especially on textured walls.
Using a fine art detail brush can help you fix small mistakes fairly quickly.

Step #11: Don’t Forget to Clean Your Stencil
You’ll likely have to stop a few times to clean your stencil depending on how big of an area you’re working on.
Taking good care of your stencil will help to set you up for success when you’re ready to use it again on another project though!

Things to Keep In Mind…
As I mentioned before, this is not my first time stenciling a big area.
So, I thought stenciling our textured walls would take maybe a few hours or at most a day.
It actually took almost 2 whole days given I had to hand stencil the walls, work around all the shelf clips and fix a few mistakes too.

So, remember to take your time, use a good quality stencil and stencil brush, and practice before you start.
It might not always be an easy process.
But having a finished product you’re excited about will be worth it in the end.

All in all, it’s been fun to learn a new skill.

And fun to see how things are shaping up.

Thank you again to Stencil Revolution for sponsoring this post and for making our pantry makeover possible.
Stencil Revolution is a family owned small business in Florida which, is near and dear to our hearts.
They have a wide range of stencils including seasonal stencils in many different shapes and sizes.
These stencils are also very affordable, so, be sure to check Stencil Revolution out.

Let us know what your experience has been stenciling textured walls, floors or other special projects. This time of year is perfect for dreaming up something special.
Until next time, I’ll see you on Instagram, Facebook and Pinterest.
Many blessings,
CoCo


Wow, Coco, this is beautiful and a lot of work too. It looks great. I would love to do something like this in my girls’ room or on a smaller scale for Christmas. Thanks for the tips.
This would be perfect in a girls room but honestly Stencil Revolution has a lot of different wall stencil options to make sure you check out their website. They also have smaller stencils if you want to “practice” on something first like making a sign for the holidays. The stencils are thick so you should be able to use them multiple times with the proper care. Hugs and let us know what you decide, CoCo
What a huge difference! That bee stencil changed the look of your entire pantry. I can’t wait to see more
We thought the same thing, Bonnie! So glad you like the results of the pantry so far. This stencil was super easy to use if you ever decide to try something like this too. They also have smaller stencils if you want to do a pillow or a doormat or even a galvanized buck or sign for Christmas. Stencil Revolution has a lot great options and the prices are good too.
How beautiful! I have never tried stenciling, but after seeing yours I should give it a try!
Thank you bunches, Denise! It’s a great alternative if you have textured walls and wallpaper is not an option. You definitely have to take your time. The results we got from hand stenciling was a lot better than the results we got trying to use a roller so keep that in mind too. You don’t necessarily have to take one something this big the first time but you should give it a try when you have the chance. It made a huge difference for our tiny pantry. Hugs, CoCo
Hey CoCo – stenciling the pantry walls was well worth the effort! The painted effect has added so much dimension and texture. Plus – who can resist the charm of French Bees? Beautiful job…we love following your progress!
Thanks so much ladies! We cannot get over what a difference the French Bee stencil made in such a tiny space. It seemed like a gamble at first but I’m really glad we gave it a go. I would definitely do something like this again. We appreciate all your love and support during the One Room Challenge. It’s been such a blessing, CoCo
Gorgeous!! I have only used a stencil once, and I mean once! It was a hot mess and it wasn’t even on a wall! I love the look of this and that bee print is just too pretty! The paint color is great also! Textured walls are a nightmare to paint, especially with something like this or an accent wall. It is so difficult to get a clean cut but you did an awesome job! Have a great one!
Thank you so much Benita! We appreciate all your kind words and comments. I totally know what you mean about stenciling textured walls. They were definitely tough at first but having the right tape and brush made a huge difference. The lines of this stencil were also very easy to follow which made it easier too. I have a TINY bathroom that needs a little bit of love as well so maybe after the holidays we’ll try it again 🙂 Sending you hugs for a happy day, CoCo
This looks fabulous!
I will try something small first.?
Let us know how it goes, Lizzy, we would love to see how everything comes together! Hugs, CoCo
I happened to discover your blog as I was falling down the rabbit hole searching different blogs. How delightful!!!!! I have signed on to receive your messages and anxiously await future reading.
I also have a small request….could you tell me the name of your pantry wallpaper( the white background and tiny butterflies) and also where you purchased it ? I have a small back hall that begs for it becoming a small surprise when touring my home.
I thank you in advance and look forward to following your blog.
Kindest regards..
Cynthia
So excited you found us, Cynthia, we’re happy to have you here! The pattern on our pantry walls is actually a trellis pattern with bees that I hand stenciled several years ago. The wall stencil is from a company called Stencil Revolution and the name of the stencil is the French Bee Trellis stencil. It took longer than I expected to stencil the tiny pantry but I can honestly say every single time I walk into that space it gives me so much joy. I hope whatever you choose for your back hall gives you the same feeling. Good luck with your project. It sounds like a fun one, CoCo
Wow! This is sooooo cutest! What a gorgeous pantry you have now. And with a window too! Love it.
Thanks,
LeAnne
That turned out to be beautiful! I would have never thought about stenciling the whole area. It is absolutely stunning!