How to Style a Metal Bed Crown
We’re sharing how to style a metal bed crown today!
Of all the projects we took on for the One Room Challenge Guest Bedroom Makeover, I can honestly say, the metal bed crown is the piece we get asked about most.
It’s also the idea that gave us the biggest reason to panic.

Part of it was my fault.
The weekend I was set to place the order, the website showed 12 metal bed crowns available.
Not thinking they were going to sell out anytime soon because bed crowns usually have a specific client base, I got busy and totally forgot about it.
So, imagine my complete shock when early Monday morning, I refreshed my screen to place the order and not a single bed crown was available.
I was totally bummed and mad at myself for waiting too.

If you followed along during the 8-week challenge you know we scrambled at first to come up with an alternative idea.
It was actually my bestie S who suggested we check the website one. more. time. before heading out to buy the supplies to make our own.
And as if an answer to prayer, we were completely giddy when one metal bed crown was serendipitously available.
We scooped it up immediately, eagerly awaiting its arrival.

Managing Expectations…
Truthfully, there were not a lot of extra photographs or information on this specific metal bed crown. Even though we’ve seen it for sale on two different websites.
I was kind of surprised when it arrived without a way to attach the fabric to the bed crown.
But not nearly as surprised as when the bed crown fabric I ordered was delivered in a completely different color. Here’s a mockup of my original idea for reference…

With time for the guest bedroom makeover running out, we ran to IKEA to buy additional matching duvet covers desperate to make it work.
I’m excited to say the end result was much better than I could have imagined.

Here are some of the tools we used to keep the fabric in place and how to style a metal bed crown…
Metal Bed Crown Supplies:
**(Amazon Affiliate links have been provided for your convenience. Any sales made through such links will support us with a small commission at no extra cost to you. You can read our full disclosure policy here)
- Wall Paint – Custom Blush Pink, Lowes
- Board and Batten Paint Color – Bistro White, Lowes
- Bed Crown Installation Hardware – Lowes
- **Bed Crown – Amazon (also sometimes available online via Antique Farmhouse)
- **Metal Ring Hooks with Clamps – Amazon
- Bed Crown Fabric– IKEA
- **Handheld Steamer, similar – Amazon
- Bed – Antique Shop (Learn How to Antique a Metal Bed Frame, post here)

Installing the Metal Bed Crown:
Our metal bed crown did not come with an installation kit. We had to buy anchors and screws at our local home improvement store to secure the bed crown to the wall.
This is the back…

and this is where the fabric goes…

Be sure to keep the weight of the bed crown and the weight of the fabric in mind when you’re choosing these items.
Safety should always be your top priority. Don’t hesitate to seek professional advice or guidance if you need it!

Styling the Metal Bed Crown Fabric:
The ceilings in our home are all 9 feet high.
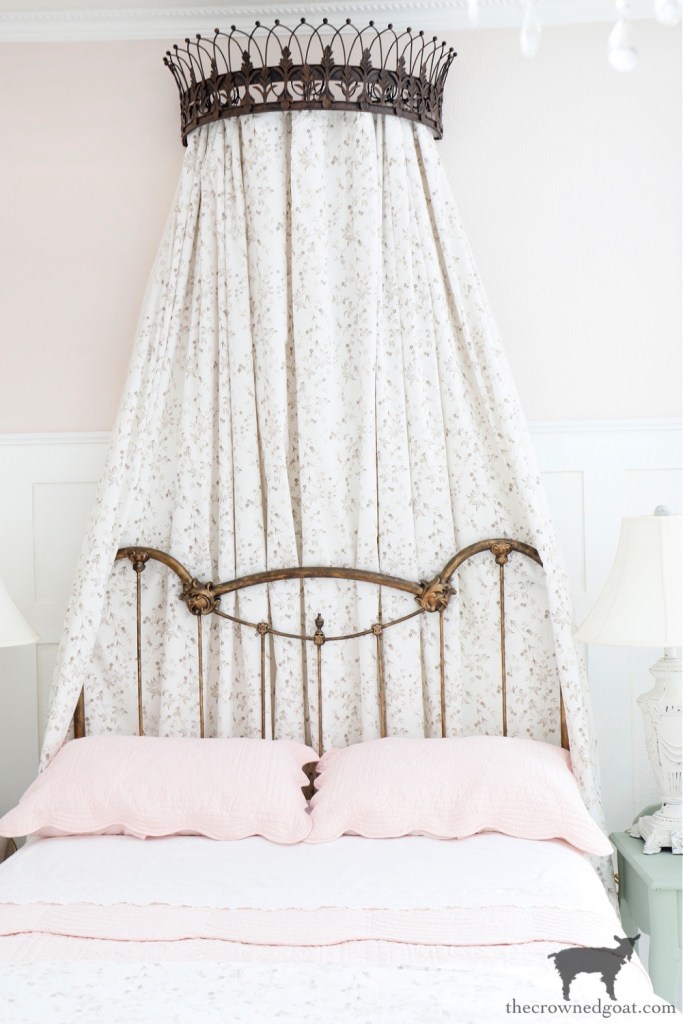
I would have loved for the bed crown fabric to reach the floor in this bedroom as it does in our other bedroom.
We were so pressed for time though our only option was to buy 2 additional duvets from IKEA to hang as bed crown curtains.

I was really worried it would look weird at first.

But once we got it all together, you barely notice the fabric doesn’t fully reach the floor.
To attach the duvet fabric to the metal bed crown, we used metal curtain rings that open with clips on them.
This allowed us to use the clips for the fabric and attach the rings directly onto the bars of the metal bed crown.
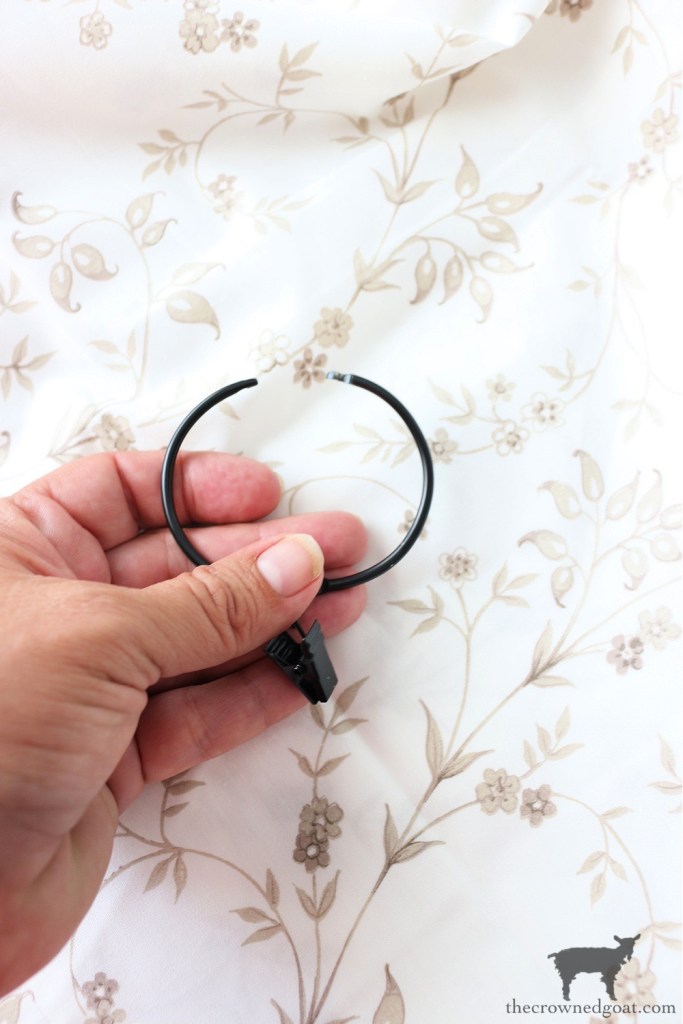
Here’s a look from the inside of the metal bed crown.
Again, safety is key! So, use caution and care when hanging and styling the bed crown fabric.

Steaming the Bed Crown Fabric:
Once the bed crown fabric had been hung, I carefully steamed the wrinkles out of each duvet working in small sections.
This is another step in the project to use caution and care. Steam and handheld steamers are extremely hot and can burn if you’re not careful.

Appreciating the Pivot:
Despite adding patina to the metal bed frame and having all the linens at the ready, it wasn’t until we installed and styled the metal bed crown that the room finally felt like it was coming together.

It’s one of those subtle statement-making elements that hits you the moment you open the bedroom door.

If you’ve ever worked to makeover a room and started out with a specific vision in mind, you know sometimes those original ideas can be hard to shake.
Even when faced with design-related challenges along the way.
It may seem frustrating at the moment. But take the opportunity to pivot where you can and keep going.
You never know the creativity that just might unfold in the process!
Let us know if you’ve ever had to pivot in the middle of a project. We’d love to hear how you handled it! Until next time, I’ll see you on Instagram, Facebook and Pinterest.
Many blessings,
CoCo


The best! Ever! So elegant.
Thank you so much, Denise, I really appreciate it! Hope your day has been a fun one, CoCo
I have a question regarding using the duvet cover for the bed curtain. Did you make two panels by cutting the duvet in half down the long side at the center? And how is it attached to the crown? Maybe there’s an instructional video or blog I missed? I want to do this over my daughter’s bed and was just wondering.
Thanks,
Debra M.
Hi Debra – We actually bought two duvet covers and hung them both on the bed crown using metal O rings. Due to the size of the bed crown we didn’t have to sew the duvets together, we simply tucked one duvet under the other so it looked like a pleat or a fold. I don’t have a video but you can find more information in the blog post titled, “How to Style a Metal Bed Crown.” Hope this helps with your daughter’s room and happy decorating, CoCo