How to Make a Fall Inspired Kraft Paper Sign
We’re sharing how to make a Fall inspired kraft paper sign today! It’s another simple way to ease into Fall decorating and dress up any seasonal vignette.
I spent a good bit of last week adding touches of Fall around the house and while we’re not completely finished, everything is starting to feel really festive.

Have you guys started decorating for Fall yet?
I know some people say it’s way too early to even think about Fall and if we were strictly going by the weather or how it feels outside, I would absolutely have to agree.

In fact, we haven’t spotted a single real pumpkin at the grocery store or at the farmers market either.
I know they’re on the way though and just thinking about their arrival makes me super excited.

Rather than spend a lot of time decorating the entire house each season, I try to focus on creating little moments in a few specific spaces.
Sometimes we’ll set up a popcorn or dessert bar in the breakfast nook, the front porch, or on the back patio. Other times, we’ll add signs like these above the mantel in the living room, the coffee bar or even hang one in the kitchen.

Fall-inspired kraft paper signs are simple to make and they can be dressed up or down depending on how you like to decorate

Here’s a look at how to make a Fall Inspired Kraft Paper Sign…
(Amazon affiliate links have been provided for your convenience. You can read our full disclosure policy here)
Fall Inspired Kraft Paper Sign Supplies…
- 1 Roll Brown Kraft Paper
- Home Computer, Computer Ink, Printer Paper
- Scissors
- Graphite Pencil
- Ball Point Pen
- Ruler
- Craft Paint, Paint Brush, and/or Permanent Markers for Brush Lettering (in the color of your choice). We used this marker
- Weighted Kraft Paper Holder
- Paper Clips or Binder Clips
- Tape
- Jute or Twine
- Tarp or Drop Cloth
- Heavy Duty Cardboard
Fall Inspired Kraft Paper Sign Steps…
Gather your supplies:
Gather your supplies and lay a piece of thick or heavy-duty cardboard on the floor, table, or your workstation.
Then cover the cardboard up with a drop cloth. This will give you something hard to press on and help to protect your surfaces.
I used an old TV box.

Unroll the kraft paper to the approximate size you want your sign to be. It can be as large or as small as you like!
Keep in mind, you’ll need to leave a little extra on the ends so the kraft paper will roll.

You’ll also want to place something that has a little weight to it on the top and the bottom of the kraft paper to keep the paper from rolling while you’re creating the sign.

Creating and Transfering a Quote or Message:
Use a program like Word on your home computer to create a quote or messages for your Fall-inspired kraft paper sign.
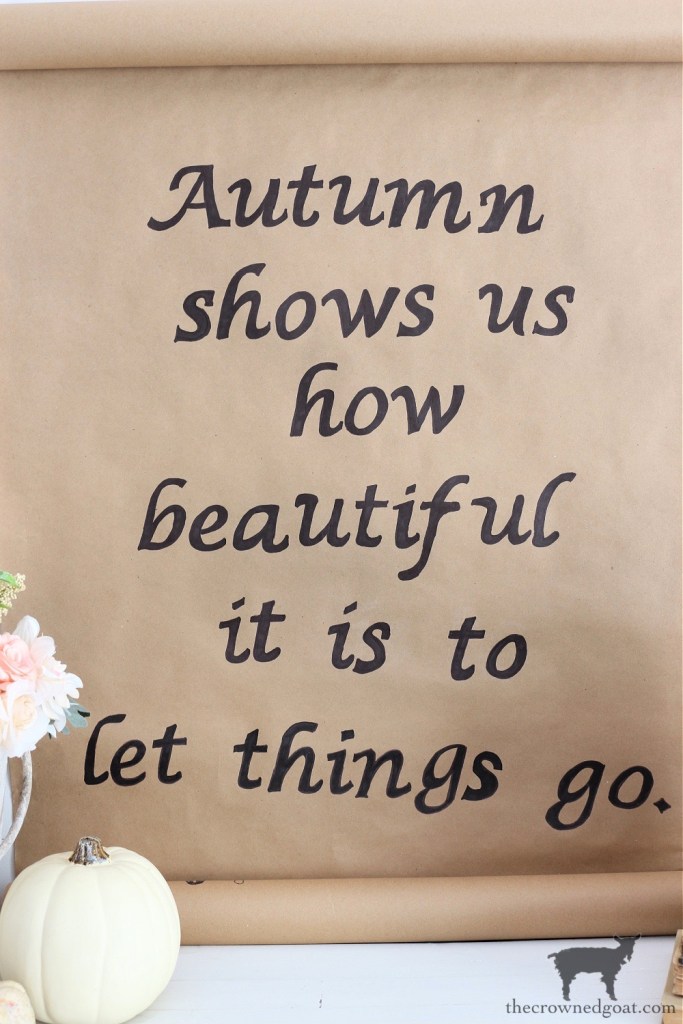
The font I used is called Lucida Calligraphy and the size I used was 244.
The quote I used was, “Autumn shows us how beautiful it is to let things go.” But you can use whatever quote or seasonal message you like best.
Print out the quote you’ve created using your home printer. It will take multiple sheets if you’re doing a large sign.

Flip your paper over and shade the back of each word with a graphite pencil.
Keep in mind the darker you shade the easier it will be to transfer the words onto the kraft paper.

Using caution and care as scissors will be sharp, cut out each word.
Then, flip your paper back over where you can see the words. Secure the words or letters to the kraft paper with tape, where needed.
I definitely wish I had taped some of the letters together because it would have been easier to transfer them that way.
Things got a little squirrely trying to line everything up at the bottom, so I just thought I would pass it along.

Once you have all the words secured and in place, use a ballpoint pen to trace over the outline of each letter.
This is also the time to make any corrections if you need to.

After the outline of the image has been transferred to your kraft paper, outline each letter with a marker.

Then fill in each letter with craft paint or permanent markers in the color of your choice. We used a brush-tipped Sharpie marker.

Allow the Fall-inspired kraft paper sign to dry completely.
Hanging Your Fall Inspired Kraft Paper Sign:
Thread a piece of jute from one end of the kraft paper roll to the other leaving a bit of extra jute so you can knot and secure the ends together.

Hang and enjoy!
There are so many different ways you can use these Fall inspired kraft paper signs from seasonal vignettes to outdoor parties and events to coffee and cider bar menus.

They’re an easy to way create an inexpensive piece of wall art or Fall décor.
Bonus, they’re completely customizable. In fact, we’ve used this same technique to create our Vintage Inspired Apple Picking Sign too!

Fall doesn’t have to be just about what you can find at a big box store. So, let your creativity run wild and make something you’re excited about!

Let us know all the fun things you’re planning to craft this season! Until next time, I’ll see you on Instagram, Facebook and Pinterest.
Many blessings,
CoCo


Thanks so much for the directions on how to make the sign! I will get to work on one of my own!
You are so welcome, Laura, glad to help! It’s always fun to think about all the different sign possibilities and Fall is a great time to craft new things too. Hugs, CoCo
I’ve seen these all over Pinterest but had no idea they were so easy to make. Thanks for these simple instructions
You are more than welcome Sarah, hope they help you make something you love! Hugs, CoCo
Love it CoCo, great tutorial.
Waiting for cooler weather here. No real pumpkins yet. It’s too warm.
Pinned
Thanks so much, Cindy, I really appreciate it! I can hardly wait for the real pumpkins to get here. I swear it feels like we’re last on the list to get them because we’re so far South 🤣 Sending you hugs and hoping you find them in your neighborhood soon too, CoCo
Beautiful. I love it so much. If you make a small enough sign it could possible go through the printer? Well, that’s what I’m going to try. Pinned. Best wishes to you for a beautiful weekend. Love your blog. Thursday Favorite Things Party. Linda @Crafts a la mode
That is such a genius idea, Linda! I’ve never tried it but I have a small space in the kitchen that needs a little sprucing up that idea would be perfect for, thank you. Heading over to see your fabulous Birthday Candle Mason Jar project now. Hugs, CoCo
Wow, you are on a DIY fall Kraft Roll…(Lame, lame, lame…but I couldn’t resist)!
Seriously, you are knocking it out of the park with these fall posts. Loving them!
ha ha you are giving me the giggles, Amber, thank you! We hardly have any storage options in this house so it’s all about making as making new decorations and reusing as many of our old decorations as we can. It’s definitely a fun problem to have. Sending you hugs, CoCo
CoCo – you have such a way of creating the best hand-lettered projects! This kraft paper sign is no exception. Love the quote you chose too – perfect for any fall home! Hugs and Love!
Lovely display!
I make signs and use a similar method. I use carbon paper to trace my letters on to the wood. Also, I use the “outline” on the words I print out so it won’t use so much ink.
I like the idea of the butcher paper. Can’t wait to make one. Thanks.
These are all such great tips, Jan, thank you so much for sharing them! Hope your Fall season is off to a great start and filled with all good things, CoCo
I love this CoCo and isn’t that true?! Love your fall vignette, just beautiful:)
It is, Tanya! I swear Fall always feels like a fresh start every single year. Hope your season is off to a special one too. Hugs and thank yous, CoCo
I absolutely LOVE your sign, CoCo! Thank you for such an amazing tutorial. You make it look so easy, now I HAVE to try to make my own. You always find the most beautiful quotes ever. Happy Wednesday!
Thank you so much, Christine, I really appreciate it! I love collecting quotes and having them in my journal for a rainy day. I swear there is nothing better than starting over and learning to let things go. It’s not always easy but it always feels like the perfect way to kickoff the Fall season. Hugs, CoCo
CoCo,
Such a cute idea. Thanks so much for sharing!
Thanks so much, Rachel, I really appreciate it! Hope your week has been a fun one so far, CoCo
CoCo,
I’d like to share a link to this post on my Sunday Dirt Road Adventures. Thanks for sharing your creativity.
That is so sweet of you, Rachel, thank you so much! I really appreciate it. Big hugs, CoCo
CoCo,
Great tutorial!! Great idea!! Thanks so much for stopping by!!
Stay safe, healthy and happy!!
Hugs,
Debbie
Thank you bunches, Debbie! It was fun to make and super easy too. Sending you hugs for a happy week and heading over to find out what you’ve been up to, CoCo
This is great and I love the saying. I think I’ll try using my Cricut to cut the letters. Pinned!
Thank you bunches, Janet! Using a Circut would be such a great idea and definitely a time saver too. Hope you’ve had a fun week, CoCo
Thanks for sharing this beautiful craft, CoCo! It will be featured on Sundays on Silverado this weekend!
Niky @ The House on Silverado
So sweet of you, Niky, thank you so much! You totally made my week. Hope yours has been a good one too, CoCo
I love simple decorations like this especially when they are easy like that one you created! Thanks for sharing – pinning!
Thanks so much, Cindy, I really appreciate it! It’s nice they can be used all season too. Hope your week is off to a great start, CoCo
CoCo, I love your Kraft paper sign and the sweet sentiment, too. The tutorial is excellent and as always everything beautifully styled. Thanks for sharing at CYS. Congrats! You’ve been featured this week 🙂
Thank you so much for featuring my kraft paper sign, Rebecca, I really appreciate it. It was super easy to make and can be used all around the house which is nice too. Hope your week is filled with all good things! Hugs and thank yous, CoCo
Thank you for this great tutorial! I’ve always wanted to make one and this explains it so well!
You are so welcome, Kristin, happy to help any time. Hope you have the best week, CoCo
This is GORGEOUS, Coco! I’d love for you to join us over at the Creative Crafts Linky Party every Wednesday through Sunday
https://creativelybeth.com/team-creative-crafts-linky-party/
Followed and Pinned! 🙂
Creatively, Beth
That is so sweet of you, Beth, thank you! We’ve been at the cabin and are back in town now so I’ll head over on Wednesday. Thanks so much for the invitation! Hugs, CoCo
I love this, CoCo!! That brown kraft paper is the perfect shade to use for this season and I love how you left the bottom heavy and curled like it is. Such a fun and easy project!!
Thank you so much, Rachel! This sign was super easy to put together. Plus, it’s nice you can use it lots of different ways and throughout the various seasons too. Hope your week is filled with all good things, CoCo