An Inexpensive Way to Update a Childhood Hutch
I hadn’t planned to share this project with you guys today. I was actually going to save it for next week but the transformation is just too exciting to wait. I was putting the finishing touches on the breakfast nook and kitchen when there was just something about the space that wasn’t working. I couldn’t quite put my finger on it but something was amiss and I literally spent a few days completely obsessing over it. You know when you have a problem you can’t figure out so you keep going over and over and over it again because you just can’t let it go? That’s what happened to me with the breakfast nook.
You may remember we had originally planned to use the farmhouse style cabinet we built last summer as an indoor drink station for coffee and cider. This concept was a non-negotiable for us because we use our drink station every day – all day. But once I stepped back in the breakfast nook to see what needed tweaking, I realized it was the indoor drink station that I kept trying to fix. I love the cabinet but it just seemed a bit too big for the space. I tried at least 3 other pieces of furniture before I dragged this one out of the garage.

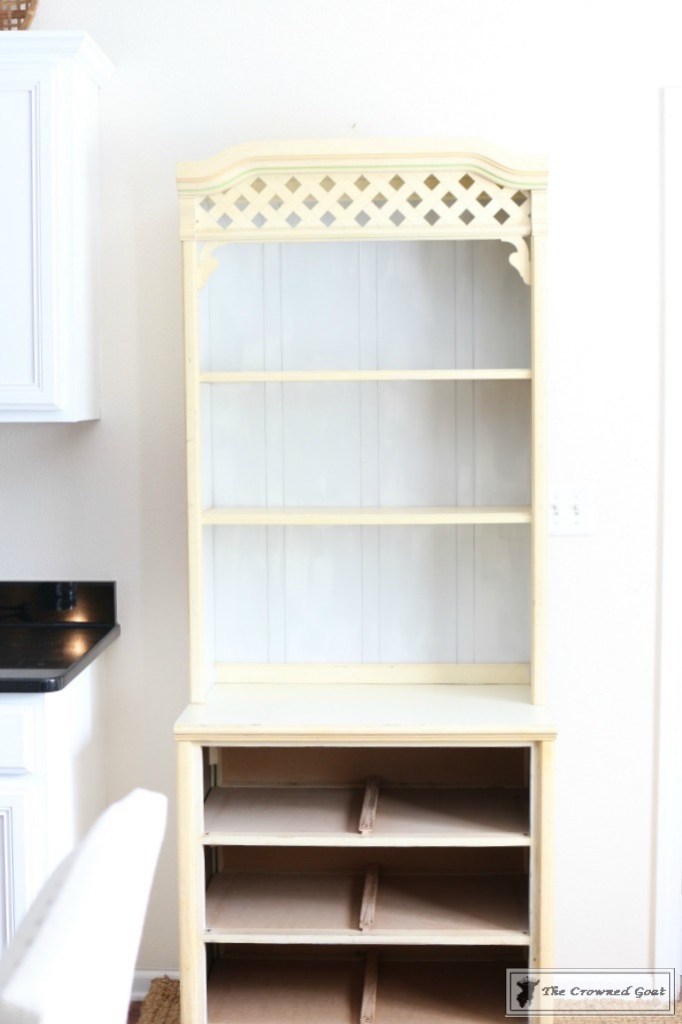
I know what you’re thinking…what the what is this CoCo! Well, this has been sitting in the garage holding all of my paints and supplies for years. It’s part of a suite of furniture my parents bought for me when I was about 2 or 3. I don’t know how they fit all of the furniture in my room. I mean, there was a huge 4 poster canopy bed, two night stands, a dresser, a desk and this hutch set. My parents saved a long time for me to get this set and for almost 40 years I’ve carted it around every place I’ve moved.
While I liked the style of the hutch there were a few things that made it seem a bit dated. Things like the yellowing finish, the flowers on the drawers and the lattice on the hutch. I knew we could change all of those things and get a completely different look for this set. Here’s a look at how all of the details came together…(Affiliate links have been provided for your convenience. Please read our full disclosure policy here )

The first step was to change the color of the piece. I sanded everything down using 220-grit sanding block. Next I used two coats of General Finishes Milk Paint Seagull Gray to paint the back of the hutch. I knew immediately it was going to drastically change the look…see what I mean?
Since we plan to use this set in the breakfast nook area, I wanted to keep all of the colors consistent so I painted the shell of the hutch and base in the same color we used on the kitchen cabinets which is General Finishes Milk Paint Snow White using two coats of paint. I also used two coats of General Finishes High Performance Top Coat to seal this piece.

Once the paint had completely dried on this piece, I started getting super excited about the direction everything was headed. But you guys, the lattice, I don’t know, it just kept bugging me a bit so we decided to take it off completely. Look at the difference, crazy, right?

We were almost finished when I decided to “trial” the look of drawers in the piece. I say “trial” because you may remember we had upcycled one of the nightstands from this set into a pet feeding station earlier this year. I grabbed a few of those drawers to see if I even wanted drawers and you know what? it was just too many drawers especially so close to the cabinet.

Next I tried a piece of fabric (think curtain style) but that didn’t work either. I finally decided to try baskets in place of drawers. You probably won’t be surprised when I say I loved it. I had several bushel style baskets in my stash already which was awesome.

A few of the baskets had a darker finish so I used dark furniture paste wax (on the outside only) make them look more consistent.

These baskets will function as produce bins for the fruits and vegetables that don’t need to be refrigerated. This will also allow the counters to remain clutter free – hello, bonus. I know! Just a reminder if you try this idea at home you’ll need to make sure to line the baskets, make sure the baskets stay well ventilated and make sure the contents of your baskets don’t come in contact with the furniture paste wax as it is not food safe.

I’ve looked at this piece all weekend and I still can’t believe how it turned out. Over the course of this year, we’ve made an intentional effort to have things in our home that are both beautiful and functional. This piece fits the bill because it will serve as our indoor coffee station and our produce bins. It definitely didn’t start out that way though. Here’s one more look at the hutch set before…
and after…
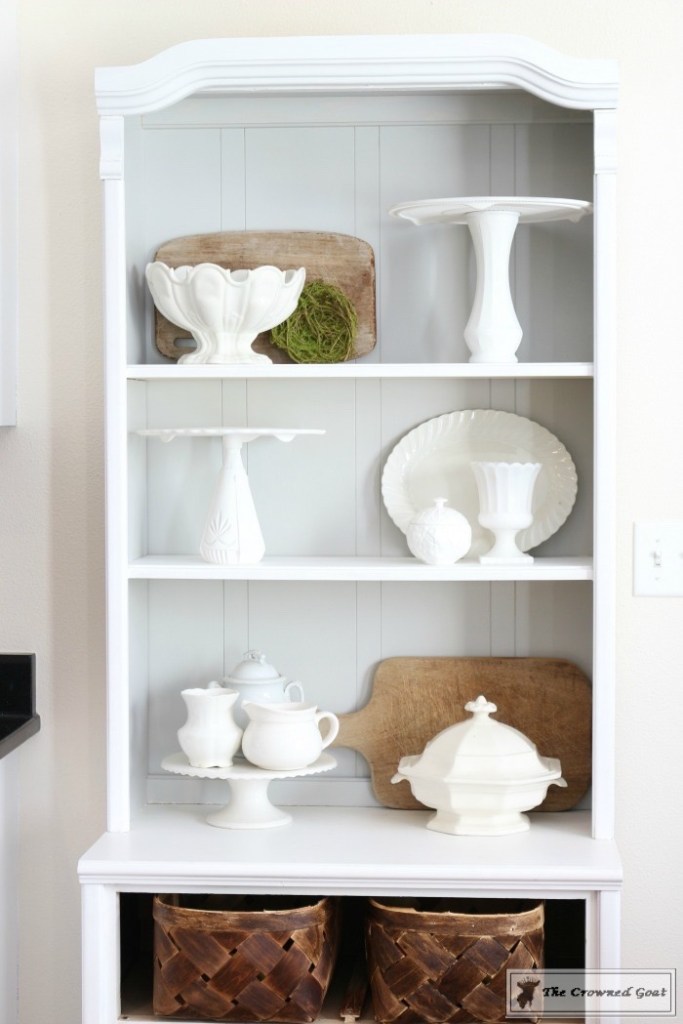
I know! Paint + imagination is such a magical thing!

See you guys back here tomorrow. I’m sharing our kitchen makeover reveal. Until then, I’ll see you Instagram,Facebook and Pinterest.
Many blessings,
CoCo


CoCo – this turned out fantastically beautiful! We love your makeovers and this is a new favorite! Love everything about it…the color, the baskets and the transformation. Well done!
I appreciate it ladies, thank you so much! Hugs, CoCo
It’s amazing how you simplified the design to make it absolutely gorgeous. It makes such a beautiful statement in your kitchen makeover… I think it’s my favorite part. Now I’m on the search for a hutch just like it! =D
I appreciate that Robin, thank you! My parents worked so hard to give us a great life, I just couldn’t let that set go, you know? It’s exciting to be able to give it a fresh look while still being able to hold onto the sentiment. If you need any furniture like this just look in the late 70s section 🙂 Sending you lots of hugs, CoCo