A Budget Friendly Shed Workstation
Today, we’re excited to share how to create a budget-friendly shed workstation as we head into Week 4 of the One Room Challenge.
![]()
As always, a big shout out and thank you to the One Room Challenge and media partner Better Homes and Gardens for sponsoring this bi-annual inspirational event.

If you’re new here and need to catch up you can read all about our painted floor, trusses, and shed update in Week 1 here our painted table, chairs, and shed update in Week 2 here and our painted hutch in New Concrete in Week 3 here.
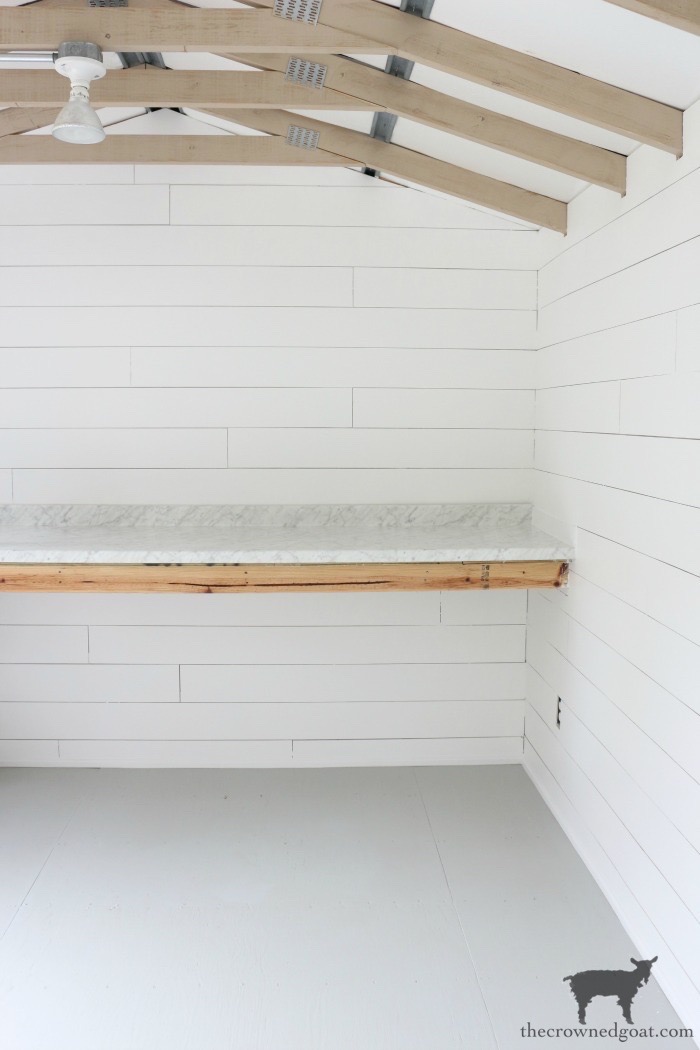
Progress from Week 3 to Week 4
I’m happy to report things are moving right along thanks to my Mom and bestie S. We were able to put a huge dent in our project to-do list last week which feels really good.

The only drama we ran into was having to move the painted hutch twice because it didn’t look good in the spot I had originally envisioned.
I don’t know how much the hutch weighs, but my guess it’s at least 65-70 pounds.
Truthfully, it was one of those moments where you sort of cringe because you know you’re about to inconvenience people you love for the sake of not settling, and for a split second, you wonder if it’s even worth it.
In the end though, despite a few bruises, we all decided the new spot was the best choice. I still have some work to do on it, but it’s going to look amazing when it’s all finished.

Creating a Budget-Friendly Shed Work Station
With the hutch issue mostly settled, I decided to turn my attention to creating a budget-friendly shed workstation this week.

Making sure I had a large workstation to craft, put together vignettes, paint small projects, and work on display details for shoots was non-negotiable from the very beginning.

The shed actually came with a built-in workstation which was a huge blessing.
And as we were insulating and building up the walls inside The Crowned Goat Cottage, it came in handy every day.

My original thought was to pour a concrete countertop.
But I wasn’t sure how concrete would hold up in the Florida heat with a 100-pound painted hutch on top.

Then I thought about using the extra boards we had leftover from installing the shiplap to plank the top of the workstation.
But visually that felt like a lot of horizontal lines.

I also thought about caulking the seam to make it look like a single piece of wood, then painting it all one color.

The seam was there because plywood usually comes in 8 ft sheets and the workstation is almost 10 ft. So, there was a big gap between the boards.
But painting it just didn’t feel right either.

Settling on a Countertop
In the end, it was actually S who found the marble laminate countertop at Lowes. And I was smitten immediately!

We had the countertop delivered and cut it to size on-site using the tools we already had on hand.
 The installation was harder than I expected because the shed’s built-in workstation was not level at all.
We definitely made it work.
Being completely honest though, I had to repaint the shiplap in multiple spots because we scratched up the walls, there was an unfortunate chip repair needed in the new countertop, and “I’m sorry” sundaes were necessary all around that day ?
It was a mess at the time but that’s all part of learning and DIY.
Creating Counter Height Table Legs From Deck Posts
After the marble laminate countertop had been installed, I realized I had less than $30 left to complete this portion of the project.
I really wanted to make the budget-friendly shed workstation look like a piece of furniture though.
Since counter height table legs start around $30 each and I needed 2 of them, I knew that option would be a go-no-go.

So, I strolled through the aisles of Lowes to try and make it work without sacrificing too much of the European garden house vibe I had envisioned.
While we were looking at exterior stairs, a project to be completed in Phase 2, I noticed some deck posts nearby.
They had a similar feel to the table legs on the DIY office work island we’ll also be bringing into The Crowned Goat Cottage and were only around $14 each.
I could not believe it!

Painting the Workstation Table Legs in Faint Maple
To keep everything consistent, I painted the apron of the budget-friendly shed workstation the same color I painted the back of the hutch and the trusses, Valspar’s Faint Maple.

And once the paint was dry, I sanded with 220-grit sandpaper because the wood has some really pretty lines and age to it.

I also painted the deck posts turned workstation legs the same color.

Then I dry brushed a bit of gray paint to the curves of the post and once they were completely dry,

I brushed a little dark and clear wax along the curves of the legs to create some patina.


S secured the legs to the budget-friendly shed workstation table using screws and our cordless drill.
And once they were in place, we called it good to go!

I still can’t get over the way everything turned out.
Truthfully, I’m beyond thankful to have a space like this to stretch out after so many years of working at the kitchen table.

Oh my gosh, you guys, it’s all starting to come together as we head into Week 5.
Fingers crossed the lights arrive soon. The single lightbulb you see above is the only light I’ve had to work from this entire time!
Be sure to check out all the fabulous progress the other One Room Challenge contributors have achieved so far!
Week 1 – Designers * Week 1 – Guest Participants
Week 2 – Designers * Week 2 – Guest Participants
Week 3 – Designers * Week 3 – Guest Participants
Until next time, I’ll see you on Instagram, Facebook and Pinterest.Many blessings,
CoCo


I love seeing your progress, this is gorgeous. I would never have guessed it’s laminate!
Thank you, Debra! It was so much harder to pick out a countertop than I thought it would be because it’s hot and humid for most of the year in Florida. While I wanted it to be functional, I wanted it to be pretty too which is not always an easy line to walk 🙂 Things are finally starting to come together though so it’s getting exciting. Sending you lots of hugs, CoCo
Hi Coco,
I love it and you did an amazing job! We have used the same kegs for projects and they’re great.
Love the laminate and the stools you chose are perfect!
Enjoy your hard work.
Cindy
That’s so exciting to know you’ve used the same legs for some of your projects too, Cindy! I’m hoping they work out because they’re really going to be a budget-friendly option in the future when we need one. Things are definitely coming together. It’s been a long haul so I really appreciate all your kind words and sweet support. Big hugs, CoCo
good for you! I love that you chose the porch spindle/legs as a budget friendly option and got the look your wanted!! Enjoying seeing the progress and having a shed is one of my dreams….. I so want to get out of the corner of our garage!
I completely understand that feeling Crystal as I’ve worked from my kitchen table and painted on our driveway next to the garage for years. It hasn’t been easy but it finally feels like things are coming together which is exciting. Fingers crossed I’ll be able to move in soon. Thanks for all your support and kind words, CoCo PS: So glad you liked the deck post/workstation legs – they were a fun gamble 🙂
It’s hard to believe that this was a shed! You have done amazing work here. I’ll defintiely be pinning to come back to for inspiration!
Such a sweet thing to say, Kori, thank you! It’s been such a long and drawn-out process I swear I never thought we would even be remotely close to finished. Little by little though we made progress and things are finally coming together. I can’t wait to see it all finished and actually start working in there 🙂 Hope the rest of your day is a fun one, CoCo
Oh boy. This one is going to be a show stopper! I can already feel it!
Such kind and thoughtful words, Heather-Scherie, thank you! It’s taken a while to get to this point but I can finally see the finish line. Cheering you on as we head into Week 5, CoCo
I love how this is coming together! Can’t believe the legs are deck posts.
Thank you so much, Maria, I really appreciate it. Using the porch posts as legs was definitely a gamble but I’m so thankful it paid off because our budget is SO tight. We’ve been working to make the shed an office for a while now so it’s exciting to feel like things are finally coming together. Hugs, CoCo
Genius! LOVE the idea of using those porch posts for legs! I also LOVE the paint treatment you gave them! It’s all coming together beautifully just like I knew it would! P.S. Those stools are perfection!
Thank you, Christine! I’m so thankful the deck posts worked out as table legs because it felt like a huge gamble standing in the aisle of Lowes. While not every project has worked out like I expected this one feels like a win 🙂 Big hugs and thanks for being such a sweet support, CoCo
Coco, I am so jealous. This craft room cottage will be so awesome for you. Can’t wait to see the finished project. Thanks for sharing at Tuesday Link Party.
It’s been a long road, Carol, but I finally feel like things are coming together! Thanks for cheering me on to the finish line. Hugs, CoCo
CoCo,
Love, love, love your shed-turned-office-space!!!!! The deck posts are great as legs. I used the same kind of posts turned upside down as legs under the counter in my garden shed… painted them blue to match the unfinished set of cabinet drawers. The drawers are the in-stock inexpensive drawers from Home Depot. Eleven years later, I still love my garden shed’s counter with its turned legs.
You have done an amazing job creating such a beautiful workspace in a prebuilt shed. But, what makes it truly outstanding is your sense of style in decor and photographing the space. I always find inspiration in your decor and photography. Pinned several photos to Pinterest boards…
Happy Thanksgiving,
Judith
Such sweet and kind words, Judith, thank you so much! Your gorgeous shed is one of my favorite spaces in Blogland so I’m excited to hear you’re still enjoying it all these years later. There were so many times I didn’t think we’d even get to finish the shed to office makeover this year because of all the rain that came from an active hurricane season. Seeing it all dressed up for Christmas makes my heart happy and feels like Santa came early this year 🙂 Sending you big hugs and lots of love for a Happy Thanksgiving, CoCo