How to Create an Elegant Winter Mantel
Did you guys a fabulous weekend? I hope so. I know I’ve shared a lot of posts on decluttering, organization and refreshing routines this month so I thought I’d switch gears a bit and share what’s been happening in other areas of life.
We had so much fun hosting my mom’s birthday brunch earlier this month. My sisters and bestie S really pitched in to make sure every detail had been executed as planned. I couldn’t have pulled it off without their help.
A few days before they arrived, I was sitting on the couch with a hot cup of coffee going over our crazy long to do list. I was looking around the living room checking to make sure everything had been tidied and decluttered when something made me look up at the mantel.
It was completely blank.
After taking all of our Christmas decorations down, I just wanted a clean, unfussy, blank canvas for a bit, you know? I thought it would be for just a day or two but a few weeks had gone by and the mantel was still blank. When you walk through our front door the mantel is one of the first things you see because of the open floor plan of our home. I knew I couldn’t leave it blank so I quickly got to work trying to create an elegant winter mantel that would fit the style of the birthday brunch but that would also be so neutral it would last until spring. Here’s a look at how all of the details came together…

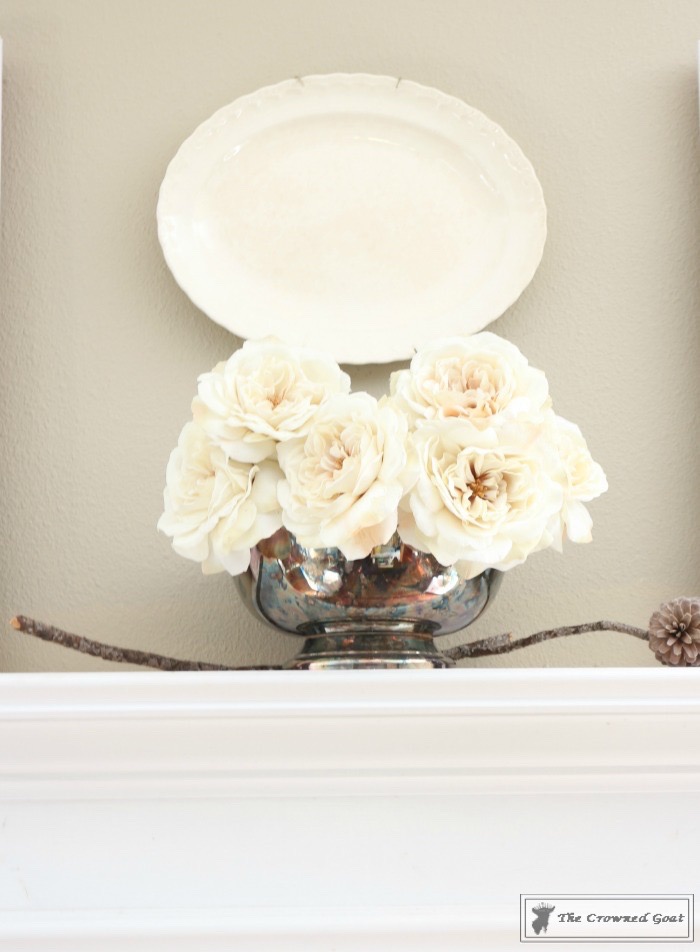
I knew in advance we would use tarnished silver trophies and roses at the birthday brunch outside so I wanted to repeat that same look on the mantel. Because symmetry is important to us, I almost always decorate the mantel in thirds starting with the center third. This tarnished trophy, roses and ironstone plate set the tone for the rest of the mantel.
Next I decided to give a few pictures we had in the garage a little makeover. I loved the details on the frame but the pictures weren’t really my style. I carefully removed the pictures from the frames, painted the frames in Valspar’s Bistro White, then painted the black velvet trim a custom gray I mixed up from previous paint projects. I could have easily removed the velvet trim and replaced it with something else but I wanted the trim to have a worn over time feel like you would find in your Granny’s attic. It took two coats of paint on both surfaces and a light sanding but they looked like completely different frames once I finished.

After the frames were completely dry I placed one on each side next to the mantel’s centerpiece. Then I searched the house for tarnished pieces of silver that would complement the trophy holding the roses. I chose a monogrammed silver pitcher for one side

and a silver champagne bucket for the other. I added a vintage plate hung with burlap inspired ribbon from each frame and filled both containers with clippings from the yard.

Whenever you’re creating an elegant mantel like this make sure you incorporate details that make it feel special. Things like the trim on the ironstone plates,

the handles on the champagne bucket,

and the monogram on the pitcher.

I know this looks really simple but let me tell ya, it always takes longer to create a mantel than people think. I tried everything from layered frames to galvanized buckets to old windows before settling on my own interpretation of an elegant winter mantel. I know I’ll have to refresh all of the greenery in the weeks to come but I’m excited the mantel will last into March.

I usually don’t decorate for Valentine’s Day but I can totally see adding a white paper heart garland or even delicate doilies to the mix for February.

See you guys back here tomorrow. I’ll share how we celebrated our mom’s milestone birthday with a fun brunch. Until then, I’ll see you on Instagram, Facebook and Pinterest.
Many blessings,
CoCo


Those pieces of tarnished silver are really pretty. Hope your weekend was a fun one and you guys are all ok from the storms.
I appreciate it, Sarah, they’re all thrifted finds so keep your eyes peeled the next time you’re at the store. Hugs, CoCo
Hey CoCo – your mantel is gorgeous! You are so correct when you say how long it can take to decorate a fireplace mantel 🙂 Yours looks fabulous and we just know that your mom loved it too! Cheers to a wonderful week!
oh my word, yes! some people make it look like the mantel was whipped together in 5 minutes but you guys know this all too well, it takes a while to get just the look you’ve envisioned. I appreciate your kind words, CoCo
Your mantel looks beautiful, CoCo! I always struggle with ours. It’s super high and not very deep and it’s a pain to decorate. I really like how you paired all the different pieces together and the flowers are gorgeous.
I appreciate it, Amy, thank you so much! The only thing tricky about this mantel that it’s almost 9 feet long so I have to fight the tendency to overcrowd it 🙂 you know what I mean? edit, edit, edit and all that jazz he he! Big hugs, CoCo
I really like your idea of dividing the mantel into thirds, CoCo. I seem to stick with the largest piece in the center and then work lower on each side. So boring.
The best part of your mantel is the originality! Love the frames and plates…such a creative idea. For Valentine’s Day I would keep it subdued and elegant. Maybe some blush colored roses or carnations?
Take care,
Jane x
All great ideas, Jane, thank you! Blush colored roses are definitely my favorite. Hugs, CoCo