The Easiest Way to DIY Robin Eggs
Today, we’re sharing the easiest way to DIY Robin Eggs!
From Puffy Paint to DIY Robin Egg Inspiration…
When my sisters and I were younger, one of my aunts used to embellish all of our cheerleading outfits for camp.
And by embellish I mean rhinestones, sequins, ribbons, and of course Puffy Paint.
Did you guys ever use that stuff?

Back in the day, Puffy Paint was ALL THE RAGE and all of my cheer camp outfits were decked to the nines ?
We used to spend hours at my aunt’s house painting those outfits to perfection.

She had a “secret” technique for getting the paint splattered “just so” which I had completely forgotten about until I was in the middle of making an easy Spring wreath and realized I could put that secret paint technique to good use.

Here’s a peek at the easiest way to DIY Robin Eggs…
We’ve had this old egg basket filled with plastic eggs for a while now.
Egg baskets like this must have also been all the rage when farmhouse style was popular back in the eighties.
I remember so many people using them to decorate with either shades of red and mustard or country blue and mauve in kitchens everywhere.

I recently came across the egg basket in my inventory closet and decided to give the eggs a bit of an update.

Painting DIY Robin Eggs…
Valspar makes a really pretty color called Tropical Spray which is a pale blue/turquoise color that is similar to the shade of Robin eggs.

Plastic eggs are not always easy to paint so I inserted a toothpick in the bottom of the egg

and used a piece of floral foam to give the painted eggs a place to dry.

You can either use a craft brush or a sponge brush to paint the eggs.

This is after one coat…

and this is after two coats.
Make sure the paint has completely dried before moving on to the next step.

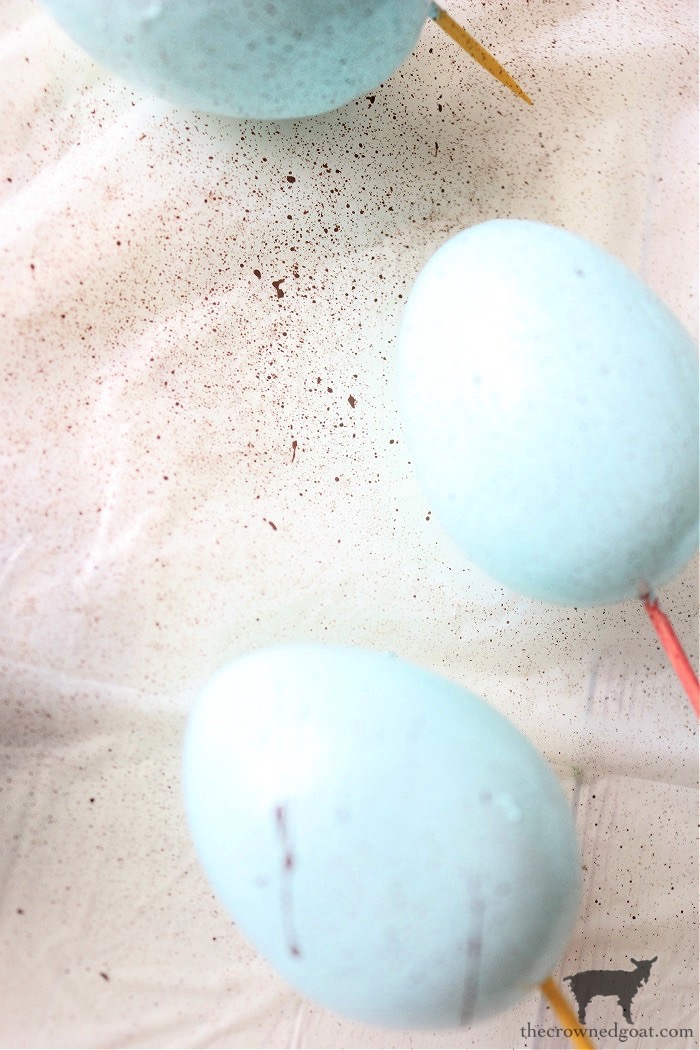
Creating the Speckles…
Now for the “secret” paint technique!
As you guys know, a Robin egg typically has tiny brown speckles.
To add those speckles to your painted egg, first, lay a piece of plastic down on your work surface because this part is messy.

Then add a small amount of brown craft paint to a plastic plate, bowl, or clean lid whatever you have on hand.

Next, take a toothbrush and dip the brush head into the craft paint.

Place your thumb or pointer finger onto the toothbrush head and rub the bristles back and forth creating a spray pattern onto your DIY Robin eggs.

You can make the paint speckles be as heavy

or as light as you want them to be.

Be sure to allow the paint to dry completely.
This is the reason you want to make sure your surfaces are completely protected. The spray gets all over!
Just a heads up…
Also, just a heads up, be really careful when you store these DIY Robin Eggs once the season is over. The paint will easily stick together if you don’t wrap and store them properly!

I added a bit of raffia back to the vintage egg basket shown above…

…but here’s a similar look if you wanted to use ironstone.

It’s super easy to snuggle the DIY Robin Eggs inside a basket or container. They’re great used as a quick and easy addition to an Easter tablescape or spring kitchen décor.

Have I told you guys how excited I am Spring has almost arrived?
I’m all about second chances and fresh starts so I can’t wait to welcome a new season. Hope you’re excited about all the good things coming your way this Spring too!

Let us know how you’re decorating for the season this year! Until next time, I’ll see you on Instagram, Facebook and Pinterest.
Other Simple Spring DIY Ideas:
- Simple Spring Home Tour
- Simple Spring Porch Tour
- Easy Spring Vignette Ideas
- How to Decoupage Easter Eggs
- Upcycled Country House Birdhouse
Many blessings,
CoCo


They ruined out perfect! I love the blue you chose.
Thank you bunches, Pamela! That soft color blue is definitely a favorite and so spring. Sending you big hugs, CoCo
CoCo – you are so very sweet to mention us! Your robin’s eggs look absolutely like the real deal! Amazing transformation and the color is so pretty!
You are so welcome! As soon as I saw your secret technique it brought back the best memories. Family is so important to us this time of year especially and I know it’s important to you too. Sending you both hugs, CoCo
I’ve always wanted to do this. Need to get on it! 🙂
Thank you bunches, Cindy! These Robin eggs are so easy to make. You could totally rock these in no time. I want to try and spray paint some next to make it even easier ? I’m thinking quail eggs this time ?
These are gorgeous, CoCo! Thanks so much for sharing them on Sundays on Silverado! 🙂 Hope you’re having a wonderful week!
Thank you so much, Niky, I really appreciate it. I hope your week is a fabulous one as well. Sending you lots of hugs, CoCo
I love these eggs! I need to make some for me. (And your aunt must be amazing to deck out your cheerleading outfits!) Thanks so much for sharing this at our Party in Your PJs link party.
I really appreciate it, Nina, thank you! My aunt was beyond sweet to craft my cheerleading outfits for camp. We had to have a different shirt and short set every day so it was definitely a labor of love. Hope your spring season is a fun one. Hugs, CoCo
Love this my friend. I used to have a tool for this and I don’t know what happened to it. It had a screen on it and you rubbed brush on it. It wasn’t as messy. Wish I still had it.
Cindy
That tool sounds like the perfect solution, Cindy! I would love to make quail eggs too but goodness gracious the mess ?♀️ I need to look into getting one too. If I find it, I’ll send the you information. Thanks for the heads up. Big hugs, CoCo
I love these eggs. I forgot about the toothbrush idea. I used to do it all the time.
Thanks for the reminder and yes it’s messy.
Pinned
It’s so messy but it works so well, Cindy! It’s fun to see all the “old school” styles of crafting making a comeback. I miss it so much! Hugs, CoCo
These DIY Robin Eggs are such a fun Easter craft!
Thanks so much, Josiah, I really appreciate it!
Coco,
These are so cute. I’m sharing on Sunday’s Dirt road Adventures. I’ll link to this post. Thanks for the inspiration.
You are too sweet, Rachel, thank you so much! I really appreciate it. Hope your weekend is a special one, CoCo
I love this CoCo! I would love to share it on my weekly round-up tomorrow.
That is so sweet of you, Kim. I really appreciate it, thank you! These eggs are super easy to make and honestly, you can leave them out long after Easter has passed too. They’re such a pretty shade of blue. Hope your weekend is peace-filled and relaxing, CoCo
These are lovely! They came out great and I love the whole back story with your Aunt & cheer uniforms. Made me giggle. Have a wonderful day. XO- MaryJo
Thank you, MaryJo! She was super sweet to “embellish” our cheer uniforms. I’m pretty sure you could see all my wild and crazy designs from a mile away ? Hope your weekend is a special one, CoCo
I’ve always loved blue speckled robin’s eggs! They really do say SPRING. Love what you did and love that egg basket! Thanks for sharing at Vintage Charm. Pinned! xo Kathleen
Thanks so much, Kathleen, I really appreciate it. They’re such a pretty spring color and super easy to make too. Hugs, CoCo
Love them!! The paint is perfect and your idea with the toothpick to elevate the eggs for painting is genius. Sharing this post on All About Home Monday evening. Thanks for coming by to link up and supporting the party!
You are so sweet, Debra, thank you! I really appreciate it. These were so much fun to make and super easy too. I’ll definitely be trying others (like quail eggs) soon. Whenever I see them in the store they are really pretty because the brown spots are bigger so I’ll keep you posted. See you at the party tonight and thank you again, CoCo
CoCo, these are all great tips for successfully painting eggs. I love the blue color that Vlaspar makes, it’s spot on for a Robin’s egg.
And the bunny plates were just too cute, I have both of them in my spring supplies!
Thanks for adding all your lovely post to the Friday with Friends link party 🙂
Thank you so much, Rachelle, I really appreciate it. Those bunny plates from Hobby Lobby were one of my favorite finds from last year. They’re the closest thing to brown and white transferware I’ve seen for Spring. Hope your weekend is peace-filled, CoCo
Omygosh CoCo…I LOVE these!! Robins egg blue is just the prettiest shade ever and SO pretty for Spring! What an amazing DIY..these turned out so beautiful!
You perfectly described my mother’s kitchen in the 80’s CoCo! I also recall ducks being everywhere too! Love your robin eggs, thank you for sharing your inspiration with us. I always look forward to seeing your ideas come to fruition.
I love the robin eyes! I would have never thought about using a toothbrush!