DIY Monogrammed Easter Eggs
We’re sharing DIY Monogrammed Easter Eggs today!
If you had a chance to check out our Simple Spring Centerpiece and Vignettes post, you know I’ve been prioritizing decluttering over seasonal crafts the year.
We just have too much stuff and I’m finally ready to let it all go.
But the more my Mom spoke about her trip to Europe and how she hoped she would be able to find the chocolate bunnies and hand-crafted panoramic sugar eggs she enjoyed as a young girl though, the more it made me want to craft something special to commemorate the season.
While these hydrangea-inspired DIY Monogrammed Easter Eggs are not nearly as artistic and detailed as panoramic sugar eggs, they’re going to be a fun addition to our Easter baskets this year.

Here’s a look at how to make DIY Monogrammed Easter Eggs for your gift baskets, tablescapes, or spring vignettes too…
DIY Monogrammed Easter Egg Supplies:
- Plastic Crafting Eggs (we found these at Michaels)
- Home Computer/Printer/Printer Paper
- Scissors
- Graphite Pencil
- Ballpoint Pen
- Tape
- Flower Embellishments (we found these at Michaels)
- Pearlized Straight Pins, optional (we found these at Amazon)
- Glue
- Tarp (to protect your work surface)
DIY Monogrammed Easter Egg Steps:
Gather your supplies and lay a tarp down to protect your work surface. We found these jumbo plastic Easter eggs with a matte finish at Michaels.

Using your home computer and printer, print out the single-letter monogram of your choice.
Once you have your monogram printed out, cut around the letter or letters using caution and care as scissors will be sharp.

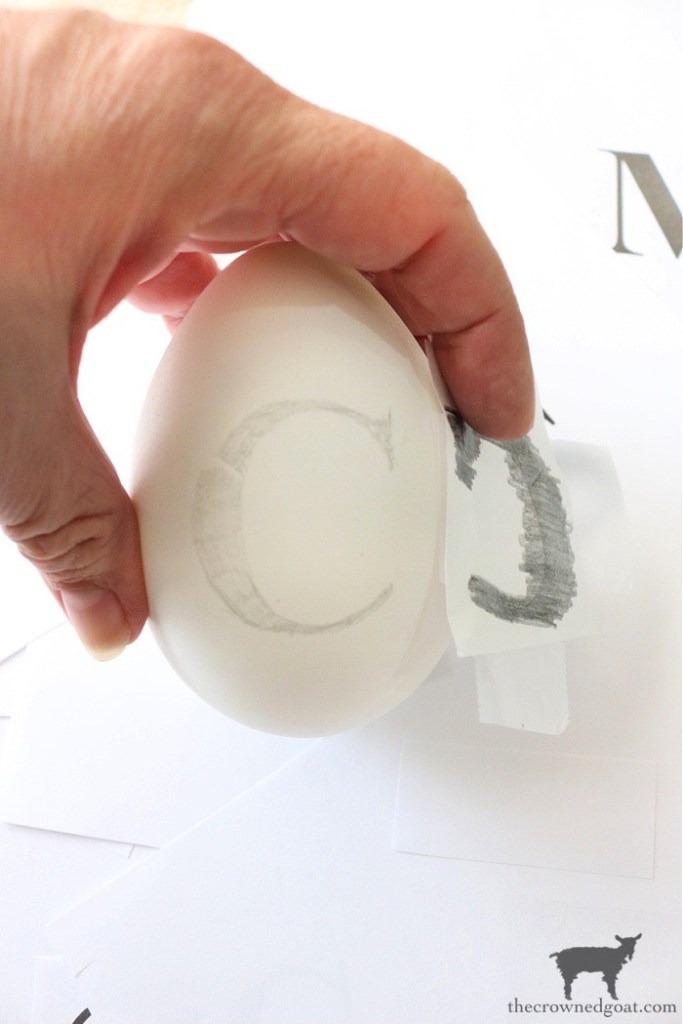
Flip the letter over and shade the back using a graphite or number 2 pencil.

Next, attach the letter to the egg with tape. Be careful not to get smudges on the egg.

Use a ballpoint pen and trace the outline of the letter.

This will lightly transfer the letter directly onto the egg.

Next, place your flower embellishments on the egg with glue.

If your flower embellishments have a center, you should be good to go as long as the glue is dry. I made this DIY monogrammed Easter egg for Piper’s basket.

If your flower embellishments have an empty center, insert a colorful pearlized straight pin into the center. Just make sure you craft this step with caution and care as the pins will be sharp.

Once the flowers and pins have been secured, place your DIY Monogrammed Eggs into a gift basket or use them as part of a seasonal display.

Decorating with Custom Easter Eggs…
What I love about these monogrammed eggs is that they’re not only simple to make, they can easily be customized to fit any special recipient or seasonal color palette.

You can also forgo the monogram completely and use the flower embellishments to make any design you want like this hydrangea-inspired Easter egg.
As with most of our craft projects, it literally took me longer to drive to town and get the supplies than it took to make them.

While I still have some shopping to do, I can’t wait to slip one of these DIY monogrammed Easter eggs into each basket.
I know they’re going to be a big hit!

Let us know if you decide to make these DIY monogrammed Easter eggs too!

Other Easter Egg Projects to Enjoy…
The Easiest Way to DIY Robin Eggs


Many blessings,
CoCo


These are adorable! I love your creativity!
I really appreciate it, Susan, thank you so much. They were so much fun to make and super easy too. Big hugs, CoCo
Super cute idea. I love it. Blessings to you, my friend.
Thank you so much, Renae. I still have a few things to get for our Easter baskets but I think they’re going to be a fun addition this year. Plus, they were super easy to make too which is always nice. Hope you’re having the best week, CoCo
Oh CoCo, I love these eggs, they are too cute, and your directions seemed simple enough. I have found here lately, I really enjoy those simple projects. I love the blue flowers with the white eggs, so classic. Thank you for sharing with Whimsy Home Wednesday!
Speak to my heart, Cara, I’m definitely all for simple projects that are quick and easy but feel festive too. I promise you could put your own spin on these and customize them any way you like in no time! Hope your week is filled with all good things, CoCo
These are adorable and I have never seen eggs decorated like this before. Pinned!
Not only beautiful but genius! Love them all. And forget CoCo, I think that C is for me! 😉 Happy Easter my creative friend. pinned
These eggs are so precious! I love the sweet little flowers, and adding the pin in the center is perfection! I don’t know how you come up with so many great ideas, but thanks for sharing them with us!! Blessings, Donna
Thank you bunches, Donna! They were so fun to make. I can’t wait to try some pink ones next. Hugs, CoCo
Oh my goodness CoCo!! These are ADORABLE!!! What a creative way to display eggs!! I’ve never seen this idea before…I love how you used flower embellishments. So pretty!! I love this so much. Pinned!
Aww thank you for your kind words, Rachel, I really appreciate it. They were fun to make and so easy too! Hugs, CoCo
CoCo! I love this idea! It is so simple and the results are so elegant and cheerful. Also, I totally appreciate you for making Piper her own egg with her own monogram. You are truly the world’s best mom to any 4 legged creature. I hope your Mom has the best time in Europe. She deserves it.
How darling are these eggs? What a great way to add a little something special to an Easter basket.
Thanks so much for joining the Grace at Home party at Imparting Grace. I’m featuring you this week!
So pretty and dainty! I am happy to feature your pretty eggs at this week’s TFT party! Happy Easter!
Hi CoCo – I am sharing a link to this post in my Easy Marbleized Eggs post that I recently updated. Love this idea.
I love your ideas and your staging. What is the large chipped paint piece behind the bow wearing bunny and the sweet C egg made with the hydrangeas? It is intriguing!
Thanks so much, Mary, I really appreciate it. The off-white chippy piece is a metal piece I chose several years ago after working on a sponsored post with Kirklands. I get asked about it all the time because it has such a vintage feel. I’m definitely keeping my eyes peeled in case I see something similar. It’s on our coffee bar right now but honestly it’s so neutral we’ve used it all over the house! Hope your holiday weekend was a special one, CoCo