DIY European Farmhouse Cake Stand
Today, we’re sharing a super simple DIY European Farmhouse Cake Stand idea. Actually, it’s more like a display stand because you can use it for so many different things including seasonal vignettes!
While this is not the first time we’ve created a display stand from thrifted finds, it is the first time we’ve ever created a European Farmhouse Style Cake Stand using a light cover as a base.

A few months ago I was shopping at the Renninger’s Extravaganza with my Mom when I found a vintage light cover for $1 and a white platter for $2.
Honestly, I don’t know what it was about the details of these pieces. But it immediately made me think of how pretty it would be painted in the same weathered style as European Oak and used as a cake stand or a display stand for entertaining.

So, that’s exactly what I set out to do. This project was super simple, and you can find all the supplies at your local craft supply store and thrift store.

Here’s a look at how you can make a DIY European Farmhouse Cake Stand too…
DIY European Farmhouse Cake Stand Supplies:
- Light Cover (the more detailed the better)
- Plate (make sure it’s proportional to your light cover base)
- Glue (we used E6000)
- Paint (we used Americana Décor Chalky Finish Paint in Restore and Primitive)
- Paint Brush
- Fine Grit Sandpaper (we used a 220-grit sanding block)
- Clear or Dark Paste Wax or Polyurethane
- Wax brush, lint free cloth or polyurethane application brush
- White Board Marker
- Tarp
- Dish Soap (one that doesn’t leave any residue)
- Clean Brush (we used a clean child’s toothbrush to help clean all the nooks and crannies)
- Lint free cloth or towel to dry
DIY European Farmhouse Cake Stand Steps:
Clean Well and Dry Completely
Before you start this project, you’ll want to make sure to completely clean and dry your light cover and plate. This light cover had a lot of little nooks and crannies.

I had to break out a clean child’s toothbrush to make sure I had removed all the dirt and dust. Once your pieces are clean, dry with a lint free cloth.

Creating a European Farmhouse Finish Painting Tips
Before you start painting lay a tarp down to protect your work surface.
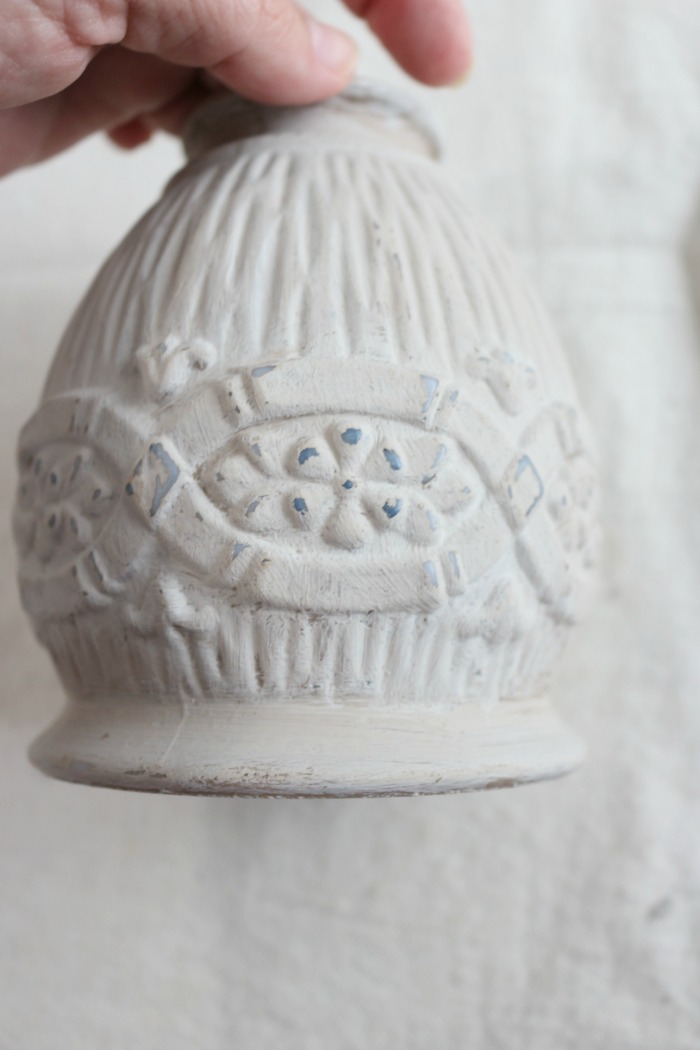
Flip the light cover over to paint it. I used Restore (the brown color) first and allowed it to dry completely.

Then I painted a whitewash coat of Primitive (the gray color) directly on top of the coat of Restore and allowed it to dry completely.
If you’ve never created a whitewash before, it’s usually equal parts paint and water depending on the consistency of your paint. But sometimes I use ¾ parts paint to ¼ part water.

Once the light cover has completely dried (at least 24 hours), lightly sand the details for a vintage feel.

Just a heads up, this paint-whitewash on glass combination chips easily so when I said lightly sand, I mean, really light ?
After you’ve sanded or distressed the light cover, you need to seal it with either a clear or dark paste wax or a polyurethane. Be sure to allow the wax or poly to fully cure before moving onto the next step.
We used a tiny mix of dark paste wax applied with a wax brush just to give it a bit of depth.

Creating a Base for Your Cake Stand
Sand the rim of your light cover with sandpaper. Then brush away any sanding debris.
Flip your plate or platter over and place your light cover in the middle.

Trace around the light cover base with a white board marker.

In a well-ventilated area, using caution and care, apply glue that has been specifically formulated to bond glass to the flat rim of the light cover. This will become the base of your cake stand.
We used E6000 because we’ve had success with it in the past. That said, make sure you read all application directions and health warnings prior to using this product. Safety first, always!

Again, using caution and care place the light cover base on the plate or platter.

Allow the glue to bond completely. E6000 starts getting tacky in approximately 2 minutes and begins setting in approximately 10 minutes. A full cure takes between 24 and 72 hours although, temperature and humidity will affect your drying time so keep that in mind.

Using and Displaying a DIY European Farmhouse Cake Stand
I let my DIY European Farmhouse Cake Stand sit for about 72 hours before I placed anything on it.

While I have this one decorated for Spring, I’ll probably use a doily or cardboard base when entertaining just to be on the safe side.

We use cake and display stand like this all over the house and in so many different seasons too. They’re super easy to dress up or down depending on how you want to style or decorate it.

I couldn’t resist using a weathered bunny and lots of spring flowers for these photos. But honestly, I can see using this same DIY European Farmhouse Cake Stand holding cupcakes for the summer, pumpkins for the fall and loads of ornaments for winter.
It’s truly that versatile of a home décor piece!

I hope this project has encouraged you to think outside the box when it comes to creating and customizing pieces of your own. Especially, accessories that are functional and beautiful!

Let us know if you decide to create a DIY European Farmhouse Cake Stand too. We’d love to see how you make it your own!

A Few Other Spring Posts You Might Enjoy:
- DIY Dutch Tulip Crate
- How to Decoupage Easter Eggs
- Spring Home Tour and Blog Hop
- How to Condition a DIY European Oak Table
- European Oak Shelves & Laundry Room Makeover at Loblolly Manor
Many blessings,
CoCo


I love this Coco! I plan to do something like this soon. Thanks for the inspo! I have a few candlesticks I picked up at the thrift that just need a pretty plate to go on top. Have an awesome day friend!
Nancy
So glad you like this Nancy! I have some milk glass inspired cake stands that I did with candlesticks and plates and we use them all the time. They’re super versatile! Can’t wait to see how yours comes together. I know it’s going to be fantastic. Sending you hugs for a happy week, CoCo
HI, Coco…this is a fun project. Tip: if you want any finish to stick well..to glass–do a coat of clear flexible acrylic sealer like Modge-Podge or another clear acrylic matte sealer. Then you have a ‘skin’ base on which to apply your desired finish. You shouldn’t have any chipping that way. I do love the earthiness on your pieces…I have made temporary cake plates with stickum foam tapes, which really helps with storage! Happy Spring! Sandi
That is such a great tip, Sandi, thank you! I will definitely give that a try. I’ve never thought about making a temporary cake plate before but gosh, that would come in really handy when entertaining and trying to set up large serving stations. Thanks so much for the great idea! Hope you and your family are all staying well, hugs and happy spring, CoCo
That is so clever and so adorable! Pinned!
You’re so sweet to say that Cindy, thank you! It was super easy too. I’ll be officially on the hunt for vintage light covers from this point forward 🙂 Sending you hugs, CoCo
This is so creative and lovely, CoCo! You’ll find lots of ways to use it!
Thank you so much, Linda! So far it’s been super easy to use indoors and out and you know we’re all about easy and versatile 🙂 Sending you hugs, CoCo
I loved your easy whitewash tips. Plus, the whitewash really added such a beautiful touch to your cake stand. Such a fun idea, thank you so much for sharing!!
I really appreciate it, Heidi! It can sometimes take months or years to find really pretty European style accents and furniture in our area so I had to find a way to cheat a little while I’m waiting for the real thing to come along 🙂 Hope your week has been a fun one so far, CoCo
This is so unique and so pretty! I love how you painted the light cover. The decorations are beautiful!
Thanks so much, Michelle, I really appreciate it! Hugs for a happy week, CoCo
Great results and well done tutorial. I love how the light shade provides a more study base of support than a candlestick does. Being a klutz and living with cats, it is such a safer way to do it!
Thank you so much, Kathy, I really appreciate it. It’s always fun to find a fresh way to create things for the house. And I’m totally with you on finding a sturdy base for things! I’ve used a candlestick for smaller projects like cupcake stands but not for a plate this size 🙂 Sending you hugs for a happy week, CoCo
Love this idea with the light cover. Beautiful!
Thank you so much, Kristi! I really appreciate it. Hope you have the best week, CoCo
Love this European farmhouse style pedestal, CoCo! So smart to use a light cover to make the base… and I love the way you styled it! I’m excited to be featuring you this week at Tuesday Turn About! Pinned!
This week has been totally bananas, Julie, so I appreciate the sweet feature more than you know. It really made my week so much brighter! Big hugs and thank yous, CoCo
This is brilliant. I often see old light fixtures like this. Its a fantastic makeover, thank you for the inspiration.
That is beautiful! Thanks for sharing that! Your blog is beautiful! Coming over from the All About Home Link Up Party.
This is beautiful! I love your signature colors!
What a beautiful cake plate CoCo! Love this idea!
Coco this is absolutely beautiful!!! Thank you so much for sharing at my Weekly Link Party! I’m happy to be featuring you this week! Have a great Wednesday!
https://www.ourtinynest.com/2023/03/08/weekly-link-party-338/
ADORABLE!!!! This is SO pretty, CoCo!! That light stand was a GENIUS item to use for this!! And that plate…just SO lovely. You are right….this can be used all year round, decorating it for the seasons. Amazing job, my friend!! Pinned!